Sunday, June 5, 2011

Baltimore oriole/Orchard oriole nest

It appears that my esteemed colleagues at the Birmingham News incorrectly ran the photos for today's story concerning a shared nest between Baltimore and Orchard orioles. For those News readers who follow this blog, allow me to post the images that should have accompanied the article:


(Click on the image to enlarge it.)

This is the adult male Baltimore oriole who appears to have usurped the role of male parent from a subadult Orchard oriole. This bird is gleaning and transporting food to dependent nestlings in the nest which wsa evidently woven by  this female Orchard oriole:


(Again, click on the photo to enlarge it.)

The tale is this: a male Baltimore oriole appears to have developed parental instincts toward the younf in the nest of an Orchard oriole in Roebuck Springs, AL. The bird has shoved aside a subadult male Orchard oriole, and is capturing and delivering food regularly to the young in the nest. The female Orchard oriole is also actively involved in supporting the young, while the male Orhard oriole seems to be dominated and confused by the presence of the larger Baltimore oriole. I have been unable to find any citiations in scientific litereature about this interaction between thses species, and wonder if it is unprecedented.

The photo that did run with the published story is not particularly well-reproduced, and the photo of the male Baltimore oriole -- pretty much the reason for the story -- was sadly omitted. I thought I would use this blog space to attempt to clarify by using my original images from the scene.

Hope this helps.

Saturday, June 4, 2011

Hot Air Balloons

A trip to Decatur, AL, over the weekend just past, and some time spent with one of my truly favorite photographic subjects -- hot air balloons. I can easily recall how in my earlier days I'd concentrate on balloons in the air.


(Click on the image for a full-screen view.)

But the thing is, it taks effort to avoid redundancy, where all the shots seem to be variations on the same theme -- only the color and the cloud formations change. So I turned back to my photojournalist's training. Set the story up, I thought. Involve the audience in the subject; explain...demonstrate. So I tried some of that, too, the 'splaining thing. And congregations of balloons, too. Lots of colors, shapes, forms...playing with the late-afternoon's directional light.


(Click on the images to enlarge.)

Eventually, it came back to me trying to show just what is is that attracts me to the balloons: I love the interplay of the colors; and I find the shapes and textures fascinating. And then, I love discovering how things work, so I get a huge charge out of looking "under the skirts" as the balloons are being inflated And that I do sincerely love, leaning into the gondola and shooting straight up into the envelope of the balloon. Great stuff.


(Click on the image to enlarge.)

The balloon shots are generally shot off-hand -- no tripod -- in order that I can be mobile, moving from ballooon to balloon, changing angles and lenses rapidly. In this instance I went onto the field with a single camera body -- my Nikon D700, the SB-900 flash to use in opening up shadows and compensating for backlighting situations, and the essential 3-lens kit: 14-24, 24-70, and 70-200, all 2.8 lenses.


The big deal is getting close enough to the subject, or zooming sufficiently, to eliminate distracting elements -- there are, after all, always scads of people wandering around a balloon event, not to mention all the ropes, fans, tanks, and trucks involved in the process.


Sunday, May 1, 2011

Flash Techniques - 1

I love to use my flashes. Love them. I own 4 hotshoe-type flash units and use them on a vast preponderance of all my photos. Can't remember the last time I photographed a person without flash. BUt even though I'm always using a flash or flashes, I endeavor to "hide" the effect of the flash -- to make the light soft and subtle.


(Click on the image to enlarge it.)


I try never to shoot direct, undiffused, on-camera flash at my subjects. In this instance, I'm using a Gary Fong Collapsable Light Sphere with the convex dome facing outward, pointed at Avera, allowing the dome to spread the softened light over the model. There's a softboxed remote flash fired from the left and another flash with a shoot-into umbrella on the right. The shots I'm posting were shot with a Nikon D700, a Nikkor 70-200 f/2.8 lens, and there was a Nikon SB-700 on the camera's hotshoe, an SB-600 left, and an SB-800 right. Periodically, there was an SB-900 firing into a gold reflector behind the model to better light her hair.


(Click on the image to enlarge it.)

I'm using flash to place highlights in the eyes, to correct the color balance to roughly 5000 K, and to shape the face most pleasingly. The moderate telephoto focal length compresses features (particularly desireable for a very thin subject; less so for what we will refer to as an unusually well-nourished individual.) Notice how soft and even the lighting on the the face appears.


(Click on the image to enlarge it.)

To me, the greatest asset the flash offers is that it allows me to open up the lighting on a face, which then allow me to concentrate on the eyes. And yes, I do use flash even on black-and-white images, as below.


(Click on the image to enlarge it.)

Notice, too the way in which flash, properly utilized, can allow the photographer to exert control over the background and create a sense to separation from the background, as in this shot:


(Click on the image to enlarge it.)

Notice how...rounded...this image seems. It's telegraphing a third dimension, making the set look large and deep, when in fact Avera is only about 4-5 feet from the back wall. Much of the light in this image is coming from the sides, with the flash on-camera used as fill to open up shadows and add highlights. Notice how much you notice the green background.


(Click on the image to enlarge it.)

This is pretty much all front-light, but diffused and soft front-light. It can be done. The combination of front-light and a long focal length obliterates the background and makes the image look intimate -- as though you are very close to Avera.

Is there a "magic bullet" -- a secret method -- for flash? No. But using flash is not hard, just arcane. Start using it as early as possible, and make your mistakes early. Get them out of your system, learn what works for you, and incorporate flash into your bag of tricks. You'll be glad you did.

Thursday, April 28, 2011

Painted Redstart

"Been away so long I hardly know the place..."
                                               - Paul McCartney

So welcome back, dear readers. Sorry that it's been so long since the last post, but the vicissitudes of my day-to-day existence caught up to me and allowed no time to add to the blog. Nevertheless, I'll make every effort to be better and more regular with my posts in the future.

I've had requests for my most recent bird photographs from the Birmingham News, so I'm going to post the Painted redstart from last week now. I will freely admit this is not the best shot I've ever taken, but the problem is that these little guys move. Constantly.


(Click on the image to enlarge it.)

Tech data is as expected: Nikon D700 camera, 300mm/2.8 lens w/2X teleconverter. Shot at f/6.3 equivalent, from atop a Manfrotto carbon fiber tripod, and Arca-Swiss head, and using a Nikon SB-900 flash with a Gary Fong Origami diffuser.

Photographing wildlife is difficult to begin with: you're often dealing with tiny, easily frightened subjects who may be in semi-permanent motion. Add to that the fact that most wildlife is most active at dawn and dusk, and that many species have camouflaged plumage or coats, and that most individuals make every attempt to work from behind cover, while avoiding you, and you see the dilemma. Wildlife photography is HARD. And it's vastly under-appreciated. Take a photo of somebody's kid and the world reacts with awe and wonder. But you worked out location, time of day, lighting, wardrobe, hair, and told them where to stand and how to look. Yeah. Not saying it's easy, but try the same thing on a warbler. Not happening. When you see a great wildlife shot, you are seeing the combination of art, technology, zoology, a dollop of psychology...and a huge pile of good luck. One in a hundred critters will allow close-enough approach to get a "decent" photo, and only one in a hundred of those will be so cooperative as to allow a really satisfying shot. Live for those. Live for those. 

Friday, March 25, 2011

Smoke Photography

Let me show you a photo:


(Click on the photo to view it full-screen)


Interesting? Want to do something similar? Here's they way it goes:
Start with some incense sticks. You do want the long sticks, not the cones. Get a bottle or can to hold the stick(s) upright once lit. Use a black background. A proper muslin or paper photographic background is to be preferred, but a length of black cloth works equally well. Try to set the incense holder several feet in front of the background. You'll want a stool, a tabletop, or some other flat surface on which to mount a flash. Use a short telephoto...a macro lens is great, but any moderate telephoto is good.


Let's shoot. With the smoking incense a close in front of you, shoot directly toward the black background with the flash coming in from the side. Trigger the flash remotely or by a synch cable, if necessary. Be careful not to allow the flash to hit the background or the lens, as that will result in flare. You may want to use the flash's manual zoom or employ a snoot to narrow the angle of the flash. Turn off the lights and cover up any open windows. Turn off autofocus -- it's too dark for it to function. You'll also want manual exposure mode, and you'll have to set the exposure by a procedure that I'll refer to as...er, successive approximation. This needs to be a pure flash exposure -- no ambient light registering -- so be sure you use an ISO, shutter speed, and aperture at least three stops less than would be required to properly expose the ambient light. Start out at f/8 at 1/125, for instance, and use ISO 400. Take a shot and evaluate the exposure. Vary the shutter speed as necessary to eliminate motion blur, the aperture to gain more depth-of-field in focus, and the ISO as necessary to accommodate the desired shutter speed and aperture. Aim for a tightly-cropped patch of the wisps of smoke as they rise from the incense stick.

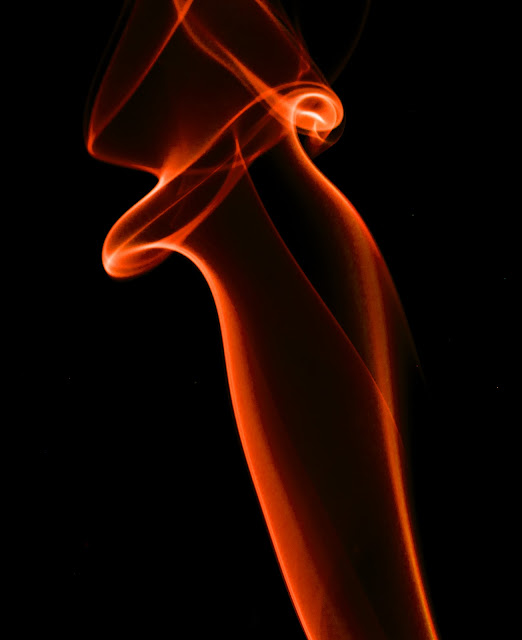
Here's an example of what you may get:

(Click on the image for a full-screen view.)

Now the game is afoot. You MAY stop right here, but there are options:
open up the image in Photoshop or whatever program you use to edit your images,
and begin to play. Either:
Desaturate the image,
Adjust the Hue/Saturation/Lightness, or
Invert the image, then adjust Hue/Saturation to taste. Example:


(Click on the image to enlarge it.)

Play around. You may want to rotate the image a little or a lot. And having shifted the colors, you might want to take a look at re-inverting the image and shifting the Hue/Saturation again. Play with Levels and/or Curves, too. Here's another example:


(Click on the image to enlarge it.)

We're in the home stretch. You might want to experiment with Posterizing, with Ink Outlines, or Poster edges. And after any of these operations, go back and revisit Levels and/or Curves, or at least Brightness and Contrast. Such as:

(Click on the image to enlarge it.)

(Click on the image to enlarge it.)

 This is a shoot that you MUST do. It's a great drill to learn to use your flash, and it's an opportunity to hone your Photoshop skills.


Friday, March 11, 2011

American Pipit -- Water Pipit

Here's a shot of an American pipit (formerly known as a Water pipit):


(Click on the image to enlarge it.)

The photo above was taken with a Nikon D700 camera, a 300mm f/2.8 lens and a 2x Teleconverter.The shot was a f/6.3 at 1/60/sec. I used a Nikon SB-900 flash. The camera was balanced on the sill of the car window, as I was using my BMW as a photo blind (!?!)

Water pipits are neat little winter visitors to wet meadows and shorelines, as well as newly-plowed fields here in the American South in winter. They are not particularly hard to find, but they are hard to photograph, as they are (a) sparrow-sized, and (b) plain brown and buff birds against a background that's generally plain and brownish, complicated by (c) the fact that they are always moving...head, legs, tail...always moving.

So the topic today is sharpness -- eliminating blur. I've had multiple people spend time with me this week talking about issues relating to "blurry pictures." Some blame the lens, some blame the camera; but the fact is that both assertions are generally incorrect -- the problem is typically user-based and can be user-remedied.

I saw shots of a kid running indoors, taken hand-held at 1/20 second. They were blurry. The shooter said the camera used to do a better job. But this is not the camera's fault -- the 1/20 sec shutter speed was simply too slow to "freeze" the subject. Because during that 20th of a second that the shutter was open the subject was moving. And during the exposure, he went from about HERE                                                                to HERE on the frame, and that produced the "ghosted," blurry image.

Another shot was a hand-held macro photo of flowers. Upon close examination, the shot was indeed soft...not sharp. But looking at the shooting data revealed that the photo was taken at 1/30 second. Again, too slow for hand-held, high-magnification work. And to attempt life-size macro-photography with a hand-held camera is to set oneself up to fail. The camera needs to be steadied with a tripod.

Blur comes from one of two sources: movement by the subject or movement by the photographer/camera. If you want consistently sharp images, you must control for both. Photographer/camera movement is the easier of the two sources to control. Use a tripod whenever possible. use a cable release when you can...anything to keep the camera from moving or being moved as the exposure is being made. And when you can, use the old rule: try to shoot at shutter speeds above the reciprocal of the focal length (i.e., 1/200 sec for a 200mm lens, 1/50 sec for a 50mm lens.) Yes, I know about VR and IS, but caution adds a useful buffer for creating sharper images.

Subject movement is a trickier issue. You may "stop" motion with relatively slow shutter speeds when the subject is moving directly toward or directly away from the camera. This is because the subjects position on the sensor doesn't change as much during the exposure as a subject moving laterally across the frame. And subjects that are small in the frame are easier to "freeze" with a slower shutter speed that a larger subject for the same reason: not much change about the space the subject occupies during the exposure. 

Subjects that occupy much of the frame, or that move verically or laterally during the exposure are tricky, though, and they require techique. Keep your shutter speeds relatively high. Lenses with fast maximum apertures are a boon here, and I think this is a major reason that you see professionals carrying "fast glass" -- lenses of f/2.8 or even faster. You may need to use high ISO settings in order to achieve your fast shutter speeds. So be it. Most modern DSLR's are pretty good up to and sometimes beyond, ISO 1600.

And for me, this is a major reason I use flash on such a high proportion of my photos -- the duration of the flash is extremely brief, and as a result, it gives the effect of a very fast shutter speed. Learn to use your flash: it is the Unfair Advantage!

Sunday, March 6, 2011

Whitewater Rafting -- Bulldog Bend

This weekend saw the annual whitewater rafting festival in Blount and Cullman Counties in north-central Alabama. For the most part, it was a tough weekend for the kayakers, with intermittent hard rain on Saturday and chilly weather on Sunday.

Here's a shot of an intrepid whitewater kayaker:


(Click on the image for a full-screen view of the photo.)

This shot was taken with a Nikon D700 camera and a Nikkor 80-400mm lens. The ISO was 400. Amazingly enough, I shot the entire event hand-held (no tripod or monopod), owing primarily to the difficulty in getting to down a steep, damp hillside to my vantage point while carrying anything more than the absolute minimum amount of gear.

The photo was taken at 400mm. Notice the compression -- how the foreground and background are brought close together. Compression is a side-effect of using telephoto lenses, and this is often a reason to make the selection to use a tele- lens rather than a shorter lens and a closer approach. The compression (and the associated loss of focus in the background) can be used to add emphasis to the subject, and to separate the subject from the background.

Colors were tricky. It was a heavy overcast, and Lord knows what "auto" WB would have given me. I used an Expo Disk to calibrate the White Balance, and it looks pretty accurate. Technically, the hardest aspect of delivering this shot had to do with getting consistently sharp focus on my shots. Here's how it was done:

Use AF-C, the Continuous Autofocus setting. This employs predictive autofocus, where the camera detects and follows motion, using the speed and direction of the subject to predict its position at the moment of exposure. Then, I used the 51-point 3-D tracking setting. This alloed me to select an active AF point, locate my subject and focus on it, then allow the system to continuously track the subject as it moved through the frame. Then, finally, I had to get a shutter speed sufficient to stop the subject's motion as the kayak bounced and glided through the course. I found it took about 1/250 second to stop that motion and generate a sharp shot. To get that, I found that I needed to use and ISO of 400 to get 1/250 second or higher at f/5.6.

All in all a fun day at the river, and lots of good shots to remember the occasion.

Saturday, February 26, 2011

Junkyard Photo Journey

I'll show a few of the shots taken at the Margaret, AL, junkyard.

Let's start with this one:


(Click on the image to enlarge it)

This is a small view of an old, rusting auto, giving the impression of other cars behind and around it. It's difficult to get a compelling shot of entire vehicles...

But the idea is always to take a picture of what attracted you in the first place, and that is frequently not a shot of the whole, but of the parts. So here's a tighter shot -- of a portion of a junker:


(Click on the image to enlarge it.)

A wise (in many regards) photographer whose initials are Jack Bains once said that, "when shooting pictures of cars, shoot the parts and ignore the whole." I agree. In fact, I'll take it a bit farther: always include only the parts that interest you and tell your story. Leave out everything else.

So, eventually, it comes down to taking photos of the smaller details. Like this shot of a broken window:


(Click on the image to enlarge it.)


And this is an almost-signatory view of what attracted me to the junkyard in the first place.

Voila: we have gone from taking shots of a junkyard to taking shots of portions of a single car, to finally taking shots of small detail elements on a car. Which is better? Which is best? Depends, doesn't it? Each shot is an integral part of telling the whole tale of the junkyard.

Technically, all the shots were taken with a Nikon D700 camera. I used several lenses while at the junkyard: the 70-200 f/2.8 for a few, though tight work is not the lens's strong suit, the 50 F/1.8 for a very few, the 24-70 f/2.8 for a large portion, the venerable 70-180 Micro-Nikkor for detail shots, and the 14-24 f/2.8 for some of the more sweeping shots. It is a blessing to have aquired so many fine lenses over the years.

All the shots were done on the "Vivid" setting. Saturation and Contrast were cranked up. Way up. There is some Photoshop work here, too, mostly touching up the "Curves" to add some intensity to the images..

Now before you make any attempt to locate and/or visit the junkyard in question, let me hasten to add that we were not warmly welcomed. The owner drove up and was very unpleasant. And before you say a word about us "trespassing," let me add that the junkyard is in an open area alongside a county highway. There was no fence, no signage advising of private property or to keep out, no number to call to request permission to enter...no indication that these were anything other than deserted junkers.

Sunday, February 20, 2011

Snow Bunting

Below is an image of a Snow bunting. This young female bird spent much of this winter in Guntersville, AL.


(Click on the above image for a full-screen view of the bird.)

Technical information: Nikon D700 camera, 300mm/F2.8 lens with 2x teleconverter (to yield a 600/F5.6 result.) This shot was made at ISO 400 @ F6.3, and a Nikon SB-900 flash was added at -1.3 stops to add sharpness, color, and contrast. It also aided in separating the foreground from the background. Once again, the camera was mounted on a Manfrotto 055CXPRO tripod for stability. (May I hasten to add that if you're attempting to do quality wildlife photos while hand-holding your camera, you're most likely just fooling yourself.)

This bird -- only the second or third ever recorded in history in Alabama -- was certainly a hard-to-get item, but unfortunately, no points are awarded to the photographer for degree of difficulty. Regardless how rare or hard to approach a subject is, no matter how cold or wet the day, or how long the drive, the image must stand or fall on its own merits. The photographer must apply the best possible techniques to each shot in order to generate shots that are more than snapshots. So get your exposure and white balance right in the moment. Don't just center the subject -- compose the shot. Use a tripod and steady the camera before shooting...and you might want to consider a remote release if you shake the camera during the moment of exposure. Good technique overcomes expensive equipment and poor technique every time.

An important rule to follow for generating better photographs is this: Get closer. You are almost invariably too far away from where you should be. About the only shot that can't be inproved by getting closer is the Grand Canyon. So approach until you no longer "see" your shot; then back up until you do see the shot you are after, and then take the photo. Nowhere is this rule more true than wildlife photography. I generally try for the "insurance" shot, then begin the process of cautiously approaching the subject until I'm satisfied with the shot. But be mindful and considerate of the subject: endeavor to leave the subject unpreturbed and undisturbed.

Wildlife is different when it comes to getting closer. Your subject may spook and depart, or at the very least, alter its behavior when it notices you attempting to approach. It's a zen kind of thing, but you should practice and develop a method that enables you to get close to wildlife. My advice is to avoid direct eye contact, to make as small as possible a figure in the field, and to avoid  appearing "sneaky." You need to develop a persona in the field that seems as though you are benign, merely wandering in the general direction of your subject. It takes a while but it does pay off.


Saturday, February 12, 2011

Rain on the Roof

Below is a shot of raindrops on my sunroof.


(Click on the image to view it in full-screen mode)

It has been a particularly cold, wet, miserable, winter in Birmingham, AL. Cold and unpleasant enough, in fact, to make it untenable to get out and shoot nearly as much as I'd like. So to compensate, it's been necessary to find alternative outlets -- to shoot whatever I have a chance to work with. This sometimes means "inventing" subject matter. So I was driving back after lunch in yet another day's pelting rain. As I arrived back at work I reached back to the back seat floorboard to grab my umbrella, and I noticed the pattern the raindrops were making on my sunroof. It seemed interesting, so I got my D700, grabbed my venerable 70-180 Micro-Nikkor lens, laid across the console, and popped off a few shots. Invigorating!

Due to the cloud cover, the exposure required no compensation for backlighting. And in this rare instance, I didn't use a flash. The hard part was getting the camera still enough to ensure a sharp image, as there's little opportunity for a tripod when I'l laid out across the front seats of my BMW. So I gave up some ISO (800) in order to get a high shutter speed (1/125) and a shrp image without camera shake. Getting the camera parallel to the sunroof was equally important.

The 70-180 Micro-Nikkor is (was) a remarkable lens -- the only zoom macro lens ever built. The lens is relatively light and complact, and uses the common 62mm filters. It isespecially useful because the photographer can use the zoom to alter the composition without running the camera back and forth to anything like the degree required by fixed focal length macro (micro) lenses. The lens is very sharp at all focal lengths, and balances and handles well. In a pinch, the 70-180 mm focal length makes the lens a good all-around mid-range tele zoom. The drawbacks? The F/3.5-5.6 aperture renders the lens a bit slow to be a useful portrait or low-light lens. The AF is slow, particularly when compared to moden AF-S lenses, and the AF./MF slider is unforgiveably bad. That and the tripod mount is rather dinky. But apart from those complaints, this is a beast of a lens: great range of focal lengths, extraordinary sharpness, and relatively affordable. The pity is that Nikon only iported the lens for a very few years. It's been gone for a decade or so now, and the legend of the 70-180 continues to grow. I seem to recall having bought my lens new for $795 in the 90's. Used copies sell for almost twice that now.

As we thaw out and dry out from the winter I'll be posting more and more outdoor work in the weeks and months to come. I hope. Look for more examples of the 70-180 Micro-Nikkor as I use it for widflowers, butterflies, and the like.

Wednesday, February 9, 2011

Broken Window

This is an image of a broken side window on an old car that I found in a (private) junkyard in St. Clair County, AL. I went back to visit the same yard a bit later and got chased. So don't bother trying to find it. Pity.


(Click on the photo to view a full-screen version of the image)

There are few things that attract me more than rust, broken glass, and peeling paint do. Ask any of my poor students : ) -- they've been out on the field trips and seen the look in my eyes when I find a "new" dilapidated old car or building. The thing is, there's so much you can do with that kind of scene, from macro to landscapes, to using them as backdrops for people pictures. And I like to shoot attractive people in front of these junkyards or decaying buildings -- it's so easy to make a girl look good in front of a falling-down house or an old rust bucket of a car.

A big consideration on setting this shot up was parallelism: I had to work to get the camera back parallel with the glass, so that the plane of sharp focus would extend from top to bottom and from left to right on the glass. If the camera had not been absolutely parallel to the broken window, there would have been a streak or a line of sharp focus and then a great deal of fuzziness.

Note the lighting, though. Photography is all about lighting, at least good photography is... When you see subject matter that strikes you as having the potential for a great shot, one of the first things to evaluate is the light. The best subject -- with the best equipment, technique, composition, and exposure -- can always be brought to nothing with bad lighting. So the challenge is to place the right subject in the most advantageous light, and then exploy all the bells and whistles: lenses, settings, composition...and you'll be hard-pressed to make a mess of the lighting and successfully "fix it in Photoshop." get it right while in the taking moment, please. So part of the reason for this shot's success was timing: waiting until the light was illuminating the glass, but not the interior of the car that housed the window. So I found the window, framed the shot, and then found the lighting to be less than optimal. So I went off to shoot other pictures for some while as I waited for the sun to get in the right position to light the shot the way I wanted. When the light was right, I came back to the spot, set up the shot and took it.

This shot was taken with my Nikon D300 camera mounted on a tripod and a Nikkor 200mm F/4 Micro (macro) lens. Tremendous lens, incidentally, if a bit long in the tooth. (The lens is the older AF-D variety, and sports the godawful AF-MF slider contraption [mine has already been repaired once, and probably needs it again soon.] ) And of course this lens dates back to pre-VR days, so it should always be shot off a tripod to ensure sharpness. Yet and though, the 200 micro-Nikkor allows fantastic working distance, and it is just SO sharp that you could shave with it. But for me its primary reason for existing in my kit is that the long focal length compresses the foreground and background to such a degree that depth-of-field in focus is extremely shallow, which serves to isolate the subject. And see how it works on this shot? No intrusion at all from any potentially distracting elements. And this shot was taken at F/8! The smaller aperture was to maximize sharpness (most lenses achieve their greatest sharpness around F/8 - F/11.)

Wednesday, February 2, 2011

Vegas Memories

The image below is the ceiling in the Bellagio Casino & Resort in Las Vegas:


(Click on the image to enlarge.)

This is a shot of the ceiling near the reception/registration area in the Bellagio in Las Vegas. This image is taken with a Nikon D700 with a 50mm/1.8 lens. The camera was mounted on a Manfrotto 055CXPRO4 Carbon Fiber tripod for stability during the relatively long exposure. The tripod affords the luxury of being able to opt for a low ISO and therefore achieving optimum image quality while maintaining sharpness. And by the way, I always have that 50/1.8 in the bag with me. It's tiny and light, and it lets in so much light that it becomes the go-to lens for low-light shooting in so many instances (wedding receptions, certain events) where a tripod is impracticable.

The lesson to be gleaned from this shot is: Look Up! I was part of a judging committee for a photo competition last week, and in going through the submissions, I was struck by how important it is to avoid pat and obvious compositions. Think about it: the vast majority of photgraphs are taken with the camera at eye-height, with knees locked. Sadly, many photographers are simply recording exactly what is directly in front of them with little thought given to options regarding perspective and composition.

One of the things I feel a photographer should impart to the viewer is a sense of surprise -- adventure. And an excellent way to achieve that is by seeking new ways to look at the subject -- by varying your approach to the subject. Don't simply settle for the obvious.

Boy, do I love Las Vegas. Love it. So much. Try to get there as often as I can. There's the restaurants, the shows, and of course for me, Vegas is just a paradise for photographers. Although it's not such a much for nature shooters, it's an amazing scene for low-light, landscape, macro, and people work. In the course of wandering the Strip, you'll pass through multiple Casinos/Resorts. Look up. The ceilings in many are gorgeous, each more ornate than the last. And that's just the ceilings. Try the opportunities for landscapes, too, as the place is quite vast. Me, I can wander the Strip for hours on end, and everywhere I look, there's another great photo op right in front of me. And I have to remind myself when faced with the grand scale on which Las Vegas is built, to look for details: look for the oft-ignored aspects, look for off-angles, the interplay of lights, colors, shapes...what a treat it is to shoot in Vegas. I hope to be there again in the coming few months. Hope I run into you on the Strip out there. If you see me, stop and say hello.

Saturday, January 29, 2011

Great Blue Heron

This is the original version of the image that is featured in the 1/30/11, edition of the Birmingham News:


(Click on the image to enlarge it.)

The shot was taken south of Pell City, AL, just below the dam at Lake Martin (Probably. If it's not Lake Martin, then it's Logan-Martin. I've never been sure. Sue me...)

Great blue herons are relatively common waders across most of North America, breeding across a wide swath of the contiguous states, as well as in southern Canda and Alaska. In my part of the world, they are easily found near any significant body of water: beaches, lakefronts, marshes, swamps, streamsides, even golf courses and wet fields...In fact, I believe that you could put out a damp rag in an Alabama back yard and a Great blue heron would turn up before the rag could dry out. Particularly impressive birds, Great blues stand nearly 4 feet tall, sport a 6-foot wingspan, and that imposing bill looks nearly a foot long. The birds are reasonably easy to approach closely, allowing for opportunities for good photography. Best places to find GBH's that are easy to approach? Go places where there are there are plenty of people around, ignoring the herons. The birds there become inured to the presence of humans.

The point of widlife photography -- to me, at least -- is to use the camera to introduce, to explain, the bird or animal to the viewer. If I'm successful, you come to know and understand the creature from seeing the photo. I am not particularly intrested in taking "mug shots" or "species shots" any longer; I want something deeper and more meaningful than that -- where you look into the subject's eyes and know what they are thinking or feeling.  

Anyway, the relevant information: Nikon D700, 300mm/f 2.8 lens with a 2x tele-converter (resulting in a 600mm/f 5.6 lens.) The camera was mounted on a sturdy tripod, and I used a cable release to trip the shutter to avoid shaking the camera during the moment of exposure. I also used a flash on the shot to add contrast and catch-lights in the eyes.

The shot was taken in late afternoon, almost sunset. I like the amber tones that late-day light provides, and the absence of harsh contrasty shadows is a huge plus, as well. And to be perfectly honest, I'm just not a morning person, so I'm always looking for a justification to shoot late in the day. The Picture Control in the camera's Shooting menu was set on "Vivid" to add contrast and saturation.

Further discussion -- if you want to use a teleconverter, put the thing on a prime (non-zoom) lens. About the only zooms that work effectively with TC's are the 70-200mm/f 2.8 lenses. And regardless of the lens you put a TC on, expect to lose some optical quality. Help your situation out by stopping the lens down at least a half-stop from wide-open.

Thursday, January 27, 2011

Island in the Stream -- Lake Guntersville

For the first post to this new blog, I thought I'd use a shot with some philosophical, atmospheric aspects.


(Click on photo to enlarge)


This image was taken at Lake Guntersville State Park -- a cold, wintry day, at last light. I used my Nikon D700 and the 24-70/2.8 lens. The camera was mounted on a Manfrotto CF tripod, and I used a cable release to prevent shaking the camera during the (long) exposure.

Photography is, at its core, a means of expression. Take the process of recording an image -- crystalizing a moment in time -- away from the mundane or obligatory: chasing screaming children around a house, yard, or playground; trying to get a group of distracted individuals to pay attention and look their best for a quick snap, pulling to the curb and leaping out for a nanosecond to attempt to capture nature's grandeur at a National Park...and there is that pure moment when you are there...alone...quiet...with your subject and a camera. And these are the times that photography can become a contemplative pursuit. You proceed wordlessly to understand your subject. You try to understand, know deeply, what and how to interpret that subject. And you begin -- not to take a picture, but to craft an image. This is where I seek to be with my work, where photography comes to life for me.

Sometimes, the subject seems to inform the photographer how to proceed -- which lens, which perspective, which settings to use -- and the image just emerges, seemingly effortlessly, from the process. I derive so much from these instances. The process is meditative, almost metaphysical, and I come back from such a session refreshed and renewed. Such a session, friends, is church. And my wish for you is that you have many such Spiritual photo sessions.