Friday, March 25, 2011

Smoke Photography

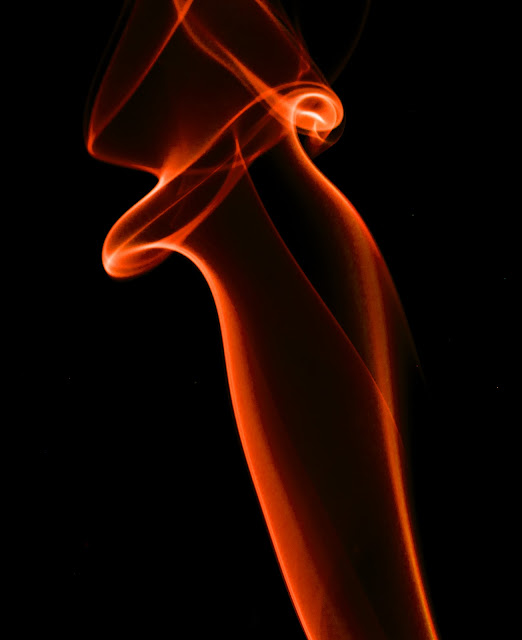
Let me show you a photo:


(Click on the photo to view it full-screen)


Interesting? Want to do something similar? Here's they way it goes:
Start with some incense sticks. You do want the long sticks, not the cones. Get a bottle or can to hold the stick(s) upright once lit. Use a black background. A proper muslin or paper photographic background is to be preferred, but a length of black cloth works equally well. Try to set the incense holder several feet in front of the background. You'll want a stool, a tabletop, or some other flat surface on which to mount a flash. Use a short telephoto...a macro lens is great, but any moderate telephoto is good.


Let's shoot. With the smoking incense a close in front of you, shoot directly toward the black background with the flash coming in from the side. Trigger the flash remotely or by a synch cable, if necessary. Be careful not to allow the flash to hit the background or the lens, as that will result in flare. You may want to use the flash's manual zoom or employ a snoot to narrow the angle of the flash. Turn off the lights and cover up any open windows. Turn off autofocus -- it's too dark for it to function. You'll also want manual exposure mode, and you'll have to set the exposure by a procedure that I'll refer to as...er, successive approximation. This needs to be a pure flash exposure -- no ambient light registering -- so be sure you use an ISO, shutter speed, and aperture at least three stops less than would be required to properly expose the ambient light. Start out at f/8 at 1/125, for instance, and use ISO 400. Take a shot and evaluate the exposure. Vary the shutter speed as necessary to eliminate motion blur, the aperture to gain more depth-of-field in focus, and the ISO as necessary to accommodate the desired shutter speed and aperture. Aim for a tightly-cropped patch of the wisps of smoke as they rise from the incense stick.

Here's an example of what you may get:

(Click on the image for a full-screen view.)

Now the game is afoot. You MAY stop right here, but there are options:
open up the image in Photoshop or whatever program you use to edit your images,
and begin to play. Either:
Desaturate the image,
Adjust the Hue/Saturation/Lightness, or
Invert the image, then adjust Hue/Saturation to taste. Example:


(Click on the image to enlarge it.)

Play around. You may want to rotate the image a little or a lot. And having shifted the colors, you might want to take a look at re-inverting the image and shifting the Hue/Saturation again. Play with Levels and/or Curves, too. Here's another example:


(Click on the image to enlarge it.)

We're in the home stretch. You might want to experiment with Posterizing, with Ink Outlines, or Poster edges. And after any of these operations, go back and revisit Levels and/or Curves, or at least Brightness and Contrast. Such as:

(Click on the image to enlarge it.)

(Click on the image to enlarge it.)

 This is a shoot that you MUST do. It's a great drill to learn to use your flash, and it's an opportunity to hone your Photoshop skills.


Friday, March 11, 2011

American Pipit -- Water Pipit

Here's a shot of an American pipit (formerly known as a Water pipit):


(Click on the image to enlarge it.)

The photo above was taken with a Nikon D700 camera, a 300mm f/2.8 lens and a 2x Teleconverter.The shot was a f/6.3 at 1/60/sec. I used a Nikon SB-900 flash. The camera was balanced on the sill of the car window, as I was using my BMW as a photo blind (!?!)

Water pipits are neat little winter visitors to wet meadows and shorelines, as well as newly-plowed fields here in the American South in winter. They are not particularly hard to find, but they are hard to photograph, as they are (a) sparrow-sized, and (b) plain brown and buff birds against a background that's generally plain and brownish, complicated by (c) the fact that they are always moving...head, legs, tail...always moving.

So the topic today is sharpness -- eliminating blur. I've had multiple people spend time with me this week talking about issues relating to "blurry pictures." Some blame the lens, some blame the camera; but the fact is that both assertions are generally incorrect -- the problem is typically user-based and can be user-remedied.

I saw shots of a kid running indoors, taken hand-held at 1/20 second. They were blurry. The shooter said the camera used to do a better job. But this is not the camera's fault -- the 1/20 sec shutter speed was simply too slow to "freeze" the subject. Because during that 20th of a second that the shutter was open the subject was moving. And during the exposure, he went from about HERE                                                                to HERE on the frame, and that produced the "ghosted," blurry image.

Another shot was a hand-held macro photo of flowers. Upon close examination, the shot was indeed soft...not sharp. But looking at the shooting data revealed that the photo was taken at 1/30 second. Again, too slow for hand-held, high-magnification work. And to attempt life-size macro-photography with a hand-held camera is to set oneself up to fail. The camera needs to be steadied with a tripod.

Blur comes from one of two sources: movement by the subject or movement by the photographer/camera. If you want consistently sharp images, you must control for both. Photographer/camera movement is the easier of the two sources to control. Use a tripod whenever possible. use a cable release when you can...anything to keep the camera from moving or being moved as the exposure is being made. And when you can, use the old rule: try to shoot at shutter speeds above the reciprocal of the focal length (i.e., 1/200 sec for a 200mm lens, 1/50 sec for a 50mm lens.) Yes, I know about VR and IS, but caution adds a useful buffer for creating sharper images.

Subject movement is a trickier issue. You may "stop" motion with relatively slow shutter speeds when the subject is moving directly toward or directly away from the camera. This is because the subjects position on the sensor doesn't change as much during the exposure as a subject moving laterally across the frame. And subjects that are small in the frame are easier to "freeze" with a slower shutter speed that a larger subject for the same reason: not much change about the space the subject occupies during the exposure. 

Subjects that occupy much of the frame, or that move verically or laterally during the exposure are tricky, though, and they require techique. Keep your shutter speeds relatively high. Lenses with fast maximum apertures are a boon here, and I think this is a major reason that you see professionals carrying "fast glass" -- lenses of f/2.8 or even faster. You may need to use high ISO settings in order to achieve your fast shutter speeds. So be it. Most modern DSLR's are pretty good up to and sometimes beyond, ISO 1600.

And for me, this is a major reason I use flash on such a high proportion of my photos -- the duration of the flash is extremely brief, and as a result, it gives the effect of a very fast shutter speed. Learn to use your flash: it is the Unfair Advantage!

Sunday, March 6, 2011

Whitewater Rafting -- Bulldog Bend

This weekend saw the annual whitewater rafting festival in Blount and Cullman Counties in north-central Alabama. For the most part, it was a tough weekend for the kayakers, with intermittent hard rain on Saturday and chilly weather on Sunday.

Here's a shot of an intrepid whitewater kayaker:


(Click on the image for a full-screen view of the photo.)

This shot was taken with a Nikon D700 camera and a Nikkor 80-400mm lens. The ISO was 400. Amazingly enough, I shot the entire event hand-held (no tripod or monopod), owing primarily to the difficulty in getting to down a steep, damp hillside to my vantage point while carrying anything more than the absolute minimum amount of gear.

The photo was taken at 400mm. Notice the compression -- how the foreground and background are brought close together. Compression is a side-effect of using telephoto lenses, and this is often a reason to make the selection to use a tele- lens rather than a shorter lens and a closer approach. The compression (and the associated loss of focus in the background) can be used to add emphasis to the subject, and to separate the subject from the background.

Colors were tricky. It was a heavy overcast, and Lord knows what "auto" WB would have given me. I used an Expo Disk to calibrate the White Balance, and it looks pretty accurate. Technically, the hardest aspect of delivering this shot had to do with getting consistently sharp focus on my shots. Here's how it was done:

Use AF-C, the Continuous Autofocus setting. This employs predictive autofocus, where the camera detects and follows motion, using the speed and direction of the subject to predict its position at the moment of exposure. Then, I used the 51-point 3-D tracking setting. This alloed me to select an active AF point, locate my subject and focus on it, then allow the system to continuously track the subject as it moved through the frame. Then, finally, I had to get a shutter speed sufficient to stop the subject's motion as the kayak bounced and glided through the course. I found it took about 1/250 second to stop that motion and generate a sharp shot. To get that, I found that I needed to use and ISO of 400 to get 1/250 second or higher at f/5.6.

All in all a fun day at the river, and lots of good shots to remember the occasion.